To contact us Click HERE
The following write-up will look at changing the ERTL Rapid Fire Shotgun (RFSG) original kid-sized brown shoulder stock to a more practical M4 shoulder stock.
For those who are keen to know more about Doomsayers (modded RFSG), you can read the original mod guide by Forsaken_angel24 at the NerfHaven forum:
Note that there are many methods to do shoulder stock mods on blasters, this isn't the only (or best) way, its just something i tested and worked.
Step 1:
Get your choice of replacement shoulder stock. In my case, i got a plastic replica adjustable M4 shoulder stock.
Step 2:
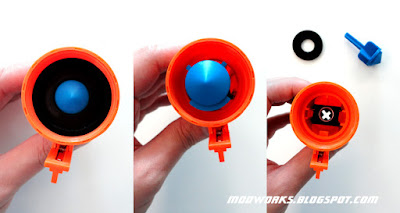
Use a dremel or handsaw to cut away the back portion of the RFSG, in my example i cut it at the section with the largest opening.
Ignore the 2 black pieces of plastic in the photo, its just some spare bits from part of the cut out section that i figured could be useful to cover gaps. Didn't get to use them eventually.
Step 3:
Measure and nest a length of 13mm SingaPlastics PVC pipe inside a shorter length of 16mm PVC pipe, this will become the connection point.
Open up the replacement shoulder stock and position a 13mm PVC end-cap inside, you'll have to trim and sand down the shoulder stock internals until it fits.
Step 4:
Bolt on the connection point pipes to the RFSG shell, i used 2 countersunk machine screws to secure it to the shell. Note that the shell is in 2 layers, so i bolted it to the inner layer.
Step 5:
Drill and sand out the replacement shoulder stock until it has a rounded opening to accept the connection point pipes, then glue the 13mm PVC end-cap permanently inside the replacement shoulder stock. I also added a ring of foam padding to help cover the gaps between the shoulder stock and casing.
Assemble everything back together and connect the new shoulder stock, its complete!
The plastic replica M4 shoulder stock i used is adjustable so it could be extended to different positions. Much more comfortable and steadier when shoulder aiming.
One of the main reasons why i did this mod was also because the Doomsayer was originally too long and it could not fit into any of my carrying cases or bags! I was getting sick of carrying it around in plastic bags with all the barrels sticking out! :)
With the shoulder stock being removable, it can now fit nicely into a large padded case.
To contact us Click HERE
Just to share some systems that i've tested with air tank blasters... hopefully it can also be a useful reference for modders.
Here are 2 demo videos which show possible setups that can be incorporated into various air tank blaster mods.
Safety Valve System - Parts Demo
System Parts: - Topeak Pump (Mini Dual G) - Pressure Gauge - Adjustable Pressure Release Safety Valve - Nerf Air Tech 3000 (AT3K) Air Tank Assembly - M6 size Pressure Rated Air Hoses - M6 size Pressure Rated Quick Release Couplers You'll notice in the video that i'm using a Topeak Mini Dual G (2-stage/double-action) Bike Pump, it has a max. pressure rating of 120 PSI and it only took me 2 easy pumps to reach 50 PSI with the AT3K air tank (a magstrike pump would have required 6-7 pumps to reach that PSI).
Thats one of the reasons why i had to install a safety valve in my modded AT3K units, 'cos the pump effort is so easy and light that i sometimes accidentally put extra pumps into it and end up exceeding 100 PSI, which makes the trigger so difficult to pull that i had to open the casing to disconnect the air hose just to manually release the excess air pressure. With the safety valve i can set the limits or vent the pressure externally.
Anyways, after trying out various replacement pumps, i now use the Topeak Pumps for all my modded AT3Ks, it allows the blaster to operate at a much higher RoF and with alot less effort, so i recommend it (or similiar high pressure rated double-action bike pumps) for any modder who is looking for a similiar combo.
Here is what an early setup looked like (before i installed the safety valve, which is positioned at where the goo gauge used to be):
TP3k = Topeak 3k. :)
--
Constant Pressure Air Feed System - Parts Demo
System Parts: - Topeak Pump (Mini Dual G) - Pressure Gauge - Adjustable Air Flow Control Valve - Rubber Air Bladder (From Nerf RF20) - Nerf Air Tech 3000 (AT3K) Air Tank Assembly - M6 size Pressure Rated Air Hoses - M6 size Pressure Rated Quick Release Couplers For this system, its similiar to what some modders have already previously done with their "semi-auto" mods, in my example i'm using an Adjustable Air Flow Control Valve to slow down the speed of the air refill from the rubber air bladder and the AT3K air tank. The air flow valve can be adjusted larger, so that the refill will be faster in between shots, but it'll also use up more air due to the increased flow leakage during firing.
Note that the constant pressure is derived from the rubber air bladder (not the air flow control valve).
Btw, all the pressure rated components i used in these setups are sourced from my local pneumatic equipment parts supply shops... i guess you can find similiar parts quite easily from online sites too. .
To contact us Click HERE
This mod guide will look into re-barreling the Mortar Pistol to convert it from firing large foam "slug" ammo to firing foam darts.
For more information about the Mortar Pistol, read my review of it Here.
Okay, lets start the re-barreling process...
Step 1:
Open the blaster casing and separate the turret from the main body.
Disassemble all the turret parts.
Step 2:
Trim the machine screw ports inside the yellow barrel holder piece, this is to allow more space for the additional air tank-to-turret seal that will be needed to optimize performance.
Step 3:
Create holders to form a secure point to attach the new barrels.
In my example, i cut 13mm SingaPlastics PVC pipes into 6 pieces of 1cm length sections, then i glued them on with high strength 2-part epoxy glue. These PVC pipe sections are an air-tight slot fit for the 1 ft length PETG tubes what i will be using as barrels.
Make sure the epoxy glue has fully cured for maximum strength before use.
Step 4:
Cut out large slot sections at the back of the blue turret piece, this will allow the barrels to be rear loaded.
Step 5:
Install a ring of foam material to create an improved seal between the air tank and turret. I nested and glued the original nozzle into a 1/2" SCH40 Clear PVC pipe section, so that there is a secure base for the foam material to be attached on.
Step 6:
Put everything back together and its completed!
In my unit, i made an additional custom barrel spacer to further support the PETG barrels. It was created by cutting 6 x 1cm length 13mm SingaPlastics PVC pipe sections (to hold the barrels) and 3 x 1cm length 16mm SingaPlastics PVC pipe sections (to link the barrel holders).
All of the PVC pipe sections were then positioned and glued together with high strength 2-part epoxy glue to form a customized PVC "ring" design barrel spacer. :)
Here is a view of the rear loading slots from the left side of the blaster.
The Mortar Pistol fires from its top barrel, so just aim directly down the turret barrels to line up your shots.
With this simple re-barrel mod, the Mortar Pistol can now load and use foam darts. :)
Distance is measured at where the shot lands (Average of 6 shots).
Air tank is filled up with 4 pumps using the stock pump.
Stock Mortar Pistol (Original barrels + Large Foam "slugs") PTG = 15 ft ATG = 20 ft
Re-barreled Mortar Pistol (1 ft PETG barrels + Foam darts) PTG = 110 ft ATG = 125 ft
Note that the tests were done under controlled conditions with custom calibrated foam darts. The results are sample estimates for reference (your results may differ depending on materials and mod techniques used).
--
Update!
I've managed to test the Mortar Pistol with a hopper clip too.
As i had already installed a 1/2" SCH40 Clear PVC pipe section around the front nozzle, i could just simply connect it directly to my hopper clip, which also uses a 1/2" spec PVC wye joint!
Here is a comparison between the 6-barrel turret vs the hopper clip.
Hopper clip assembled.
Due to the nature of hopper clips, they usually require additional adjustments and testing to get the right foam dart and hopper combination to match the blaster.
Ranges depend on the hopper clip length (and consequently the amount of clip deadspace), along with the foam dart fit in the hopper system. I get around 80-100 ft with my current setup (ranges reduce as the clip empties).
To contact us Click HERE
This was a side project that i worked on back in 2010, i completed almost 90% of it, but ended up shelving the parts 'cos i shifted my focus onto other modding projects.
Recently, i've been modding a few blasters which came in single barrel designs, they have great performance but with all the new blasters available nowadays with much higher ammo capacity and RoF, single barrel blasters tend to be at a slight disadvantage in Nerf games, so i resumed working on modular PVC turret designs to further improve the effectiveness of those single barrel blasters.
Some modders may have also seen the excellent 8-shot turrets made by SorrowX at the NerfHaven forum, he used a 3D printer to create his turret parts and the result is nicely made parts... though unfortunately the parts creation process itself is largely inaccessible to most of us modders.
My modular turret design aims to achieve a similar goal, except that it does not require a 3D printer, just PVC pipes and epoxy glue. :)
Here is the process...
Step 1:
These are the basic materials and tools that you'll need.
- 13mm / 16mm / 20mm SingaPlastics PVC Pipes (Thinwall Versions) - 1/2" PETG Tubes (.528" ID / .572" OD) - 2-Part Epoxy Glue (I use Selleys Super Strong Epoxy Glue) - Pipe Cutter
Note that all the pipes and tubes i use are able to nest within each other. This turret design is built around those material specifications.
Its also possible to make this turret with non-nesting pipes and tubes too, you'll just have to adapt the parts to fit and align with each other.
Step 2:
We will start with the barrel spacers first.
For each barrel spacer, cut 8 x 1cm length 13mm PVC pipe and 1 x 1cm length 20mm PVC pipe. Ensure that the cuts are even and matching, avoid making angled or uneven cuts.
Use the pipe cutter's reaming tool or a hobby knife to trim off any sharp bits sticking out, so that the barrel spacer ports have a smooth surface.
Position the smaller pipe rings in a balanced circle around the central large pipe ring, then fill the space in between with epoxy glue. Constantly make sure that the parts are all aligned properly.
I did the gluing process in stages. The glue is applied in successive layers, each time the glue is properly cured for a few hours before the next layer is applied. After 3-4 layers, the space will be filled in nicely and forms a very tough bond between the parts.
Do this twice to create 2 x barrel spacers.
Step 3:
Next will be the PETG barrel assembly.
In my example, i use 1ft length barrels.
Cut 8 x 1ft PETG tubes and slot them into the barrel spacers, check that they are all aligned.
Do NOT glue the barrels in yet! We still need to mount the barrels onto the main turret assembly later.
Step 4:
This is the main component of the turret system, which comprises of the connection and turret rotation points.
Cut 1 x 4.5cm length 16mm PVC pipe, 1 x 2cm length 20mm PVC pipe and 1 x 2cm length 16mm PVC pipe.
Epoxy glue them together vertically, make sure they are aligned with the barrel spacer positions.
Step 5:
Build up the rest of the turret fitment parts.
Note that i design my turret connection point to connect to 20mm pipe couplers which i use in all my modded blasters, if you use other kinds of couplers, you'll have to adjust accordingly.
Cut 1 x 2cm length 20mm PVC pipe (as the connection point), 1 x 4.5cm length 13mm PVC pipe (to slot into the main nozzle to reduce deadspace), 1 x 5cm length 16mm PVC pipe (as the barrel spacer holder and rotation point) and 1 x 1cm length 13mm PVC pipe (as a base for the bottom turret "barrel stopper", explained later).
Epoxy glue everything in.
Step 6:
Prepare the turret system.
Cut out a suitable sized ring of foam padding and attach it on the top nozzle for the turret seal, put a rubber o-ring around the middle rotation point (i used a Nerf Stampede o-ring, apply grease to it so that the rotation is smooth) and stack some foam inside the bottom section along with a dome shaped stopper (i used a plastic button from a coat).
The dome shaped part at the bottom acts as a "barrel stopper", when the turret turns, the stopper will be pushed back and compress the foam behind, then when the next barrel is in position, the stopper pops back forward and locks the barrel in place.
My earlier designs used a toothed clutch system, but i found that too troublesome to make (alot of tedious precision cutting of the PVC sections needed), and they were not really required since there isn't an integrated auto-rotation mechanism anyways.... the system just required something simple to hold the barrels in place.
Step 7:
Connect the turret system to the barrel assembly.
I used 1 x 1cm length 16mm PVC pipe as a fastening collar to secure both components together, bolted on with 2 x machine screws. This also facilitates easy changing of parts if required.
The fit of the fastening collar is very important, make sure it secures the parts tightly (but still allowing smooth rotation with the o-ring), this keeps the barrel assembly constantly level with the air exit nozzle at the top section. This is essential to achieve 100% turret air-seal.
The barrels can now be glued in permanently if you wish... but in my case i leave them secured by friction fit, i've test fired hundreds of shots and they all still stay in position (just adding an extra layer of tape on the looser barrels did the trick), so i can also have the option to change the barrels anytime if needed.
Every barrel has been tested with 100% turret air-seal, the plunger stops mid-way when the barrel is blocked and it can even vacuum load foam darts too. :)
Completed SGN-8T : Modular PVC Turret!
Here is an example of the Modular PVC Turret fitted on a modded PAS with a 20mm coupler connection... i call it PAS-8T.
Rear loading ammo slots, 3 on each side = 6 rear loading slots in total.
The turret can be easily swapped between blasters with compatible coupler connections. :)
To contact us Click HERE
Experienced modders who have worked on the ERTL Pump Action Shotgun (PAS) will know how easy it is to convert it from firing its original foam ball ammo to firing customized foam dart ammo... and most have experienced the nice 90-100ft ranges that can be easily achieved even with just the stock spring and plunger seal (especially when matched with the right foam dart and barrel setup).
But exactly how fast can it be done?
This "speed modding challenge" came about a while back when one of my colleagues got his brand new PAS in the mail, then he proceeded to open the box and mod his unit on the spot, so we quickly took the opportunity to time the entire conversion process. As the conversion mod is easily reversible, it eventually became a sort of fun competition amongst the guys to see who can mod faster!
Some new modders wonder how a PAS can be modded quickly and easily, so i created a demo video to show how its done.
Here is how to transform a 15ft range foam ball blaster into a 90-100ft range foam dart blaster... in just 3 minutes! :)
Yeah, it kinda makes modding most other blasters look way too time consuming and tedious in comparison (to achieve similar ranges). :)
To contact us Click HERE
Wouldn't it be useful to be able to easily replicate and make your own replacement blaster parts? or perhaps even custom make parts too?
The common method to make replacement parts amongst modders usually involves cutting shapes out of polycarbonate sheets, but that requires a fair amount of work with special tools, along with lots of polycarbonate dust flying everywhere.
The other method is to contract a custom parts fabrication company to do it, but that requires dealing with minimum order quantities and higher monetary expenditures, not really cost efficient for simple blaster parts.
Therefore i was looking at an easier (and cost effective) method to make detailed parts as and when required.
With this objective in mind, i looked into a technique that is commonly used in many scale model hobbies to make replicated parts = Epoxy Resin Casting.
I've seen modders use epoxy resin to reinforce joints or to fill up empty spaces in blaster casings, but i've not yet seen anyone actually make working detailed blaster parts using epoxy resin.
So i tested out the epoxy resin cast method and it works!http://www.blogger.com/img/blank.gif
Here is the build process...
- Make the Casting Mold -
In my example, i use EasyMold Silicone Putty to make the casting mold, so my process will be based on this particular product.
Once a silicone mold is made, the same mold can be used repeatedly for casting many parts.
There are other similar silicone mold brands that can also be used too, just follow the instructions specific to those products.
Step 1:
Mix 2 equal parts of the silicone putty components. Knead the mixture until the color is uniform.
You will need to work fast as the EasyMold Silicone Putty compound has a very short working time.
Step 2:
For this example, i will be casting a PAS trigger.
Press the original plastic PAS trigger into the prepared silicone compound, make sure it sits completely in the putty and creates a detailed impression.
Note thats this is a one part mold. For functionality and simplicity, i only needed to replicate the right side of the trigger as thats the side that requires part detail for the catch spring to mount on.
For more detailed molds, 2 part molds can also be made by creating the mold in 2 stages with enclosed mold pieces.
Step 3:
After 20+ minutes, the silicone mold will cure enough that you can remove the original part.
Leave the silicone mold to cure further for a minimum 24 hours... then its ready for usage.
- Make the Epoxy Resin Cast Part -
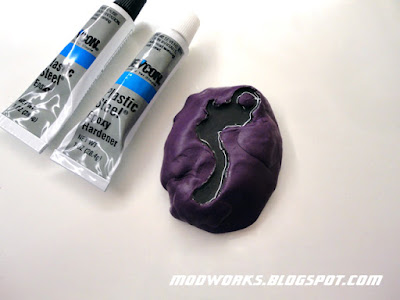
For the casting material, i used high strength 2-part epoxy resin. The epoxy resin does not adhere to the silicone mold so its suitable as a casting material.
I've tested various epoxy resin and they all vary in strength depending on the intended application. Since the part i intend to make undergoes high mechanical stress loads, i found that Devcon "Plastic Steel" Epoxy worked well, as it has good tensile and shear strength.
Step 1:
Mix the 2-part epoxy resin and hardener until it has a uniform color, then apply the mixture into the silicone mold in layers until it is completely filled.
Make sure to fill up the mold completely so that there are no unfilled spaces or air bubbles trapped inside.
Let the epoxy resin cure for 6-8 hours (cure time will depend on environmental conditions).
Step 2:
After the epoxy resin cast part has cured, remove it from the mold. Just flex the silicone mold slightly and the part will pop out.
Trim off any mold lines or excess epoxy resin material with a hobby knife or sanding file.
Here is a comparison of the epoxy resin cast trigger versus the original plastic trigger.
If the cast part comes out with lots of holes (looking like swiss cheese), then it's probably due to too many gaps and air bubbles introduced during the mold filling process.
Just mix a small amount of epoxy resin again to fill in those holes and let it cure further.
Step 3:
Fit the epoxy resin cast part to the blaster, it should have a perfect fitment.
Do any further trimming or adjustments as required, then you can start using it.
Since you can re-use the silicone mold many times, just cast a new part anytime as and when needed! :)
Application Demo Video:
Summary:
So far, i've tested the epoxy resin cast PAS triggers and they were able to handle up to 20+ kg load main springs. The catches worked perfectly over hundreds of shots, so it looks like they can be suitable and durable replacements for other load bearing parts too.
Yes... its indeed possible to make epoxy resin cast blaster parts! :) .